
Integrating ServiceNow and jQuery can be very intimidating. This post will go through the process of creating a ServiceNow page that integrates with jQuery and the jQuery UI libraries. The ServiceNow page will be displayed through a GlideDialogWindow for a very clean and integrated effect that shows a window with the jQueryUI accordion plugin.
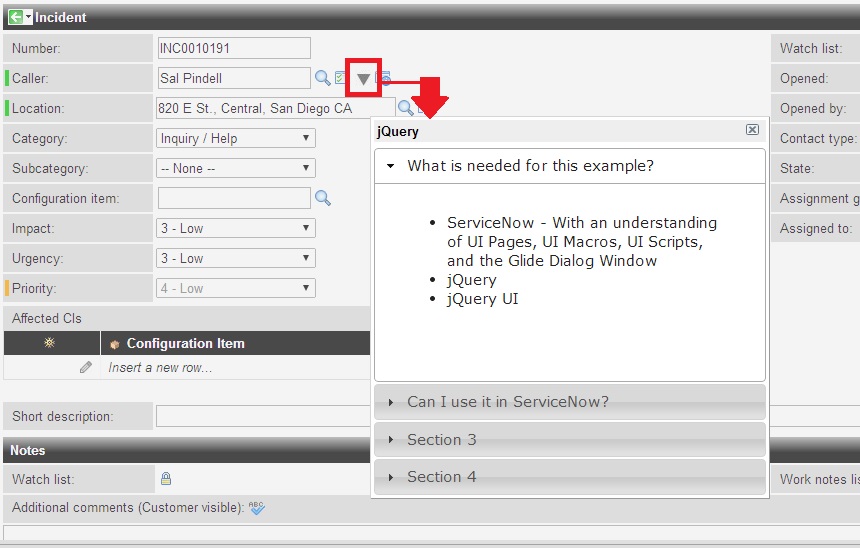
Screenshot of the completed demo:
Step 1 : Uploading the jQuery and jQuery UI files to ServiceNow
ServiceNow will allow the <script src=”…”> tag to be used on a standalone page; however, since we will be using this inside a Glide Dialog Window the source code of jQuery and jQueryUI must be uploaded to the UI Scripts library.
When working in Jelly, ServiceNow will allow us to call the scripts through the tag <g:include_script>. This tag will be furthered explained in step 2.
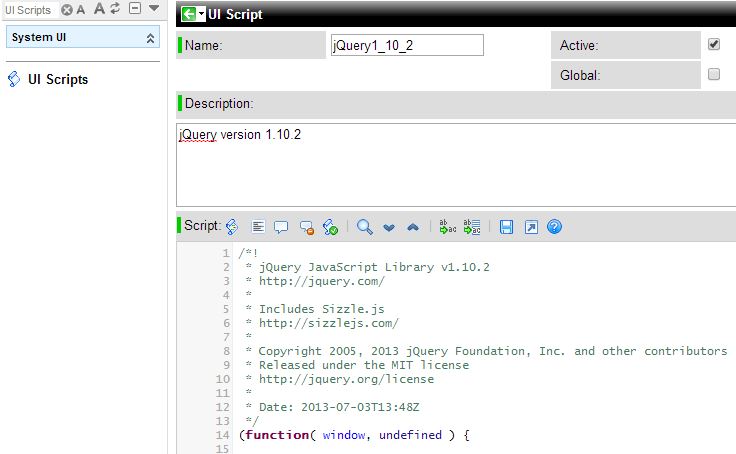
- To upload the scripts, navigate to UI Scripts
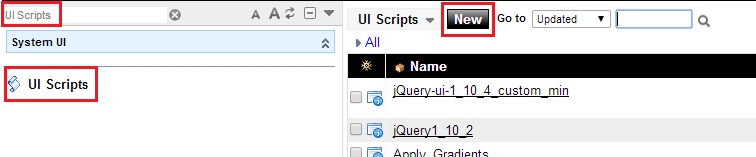
- Copy and past the source code of both jQuery and jQueryUI files into ServiceNow. Both files can be downloaded from http://jqueryui.com/download/. (It is recommended to use the jQuery min files as they are smaller and will load faster; however, I have used the easier to read forms in this demo in order to increase readability).
Step 2 : Creating the UI Page
The UI page is the most complex part of this setup as there are two important parts… the
<g:include_script src=”jQueryFILE.jsdbx”>
and the use of …
jQuery.noConflict(true);
* Tyler Jones wrote a great article on the Right Way to Use jQuery With ServiceNow detailing the two commands above.
Here is the UI Page code. Notice that instead of using $ or $j, we are creating our own context for our version of jQuery in the variable $j_custom to ensure we do not conflict with any version’s of jQuery that ServiceNow is using.
Also, the jQueryUI depends on a CSS style sheet. I am using the one from the Google APIs.
UI Page Name = jqueryUIpage
<?xml version="1.0" encoding="utf-8" ?>
<g:include_script src="jQuery1_10_2.jsdbx"/>
<g:include_script src="jQuery-ui-1_10_4_custom_min.jsdbx"/>
<link href="//ajax.googleapis.com/ajax/libs/jqueryui/1.10.4/themes/smoothness/jquery-ui.css" rel="stylesheet" />

<script type="text/javascript"/>
var $j_custom = jQuery.noConflict(true);
  $j_custom(function() {
    $j_custom("#accordion").accordion();
  });
</script>

<div id="accordion">
<h3>What is needed for this example?</h3>
<div>
<ul>
   <li>ServiceNow - With an understanding of UI Pages, UI Macros, UI Scripts, and the Glide Dialog Window</li>
</ul>
<ul>
  <li>jQuery</li>
</ul>
<ul>
  <li>jQuery UI</li>
</ul>
</div>
<h3>Can I use it in ServiceNow?</h3>
<div>
Absolutely! Make sure to use the jQuery noConflict(true) to ensure that this works.
</div>
Step 3: Create the UI Macro
The UI macro will allow an icon to be shown next to a field in ServiceNow. This is a great way of ensuring that an Incident form does not become cluttered with too many fields.
- Upload an image to the images gallery that is 16×16 pixels. This example will use the icon triangle.jpgx

- The UI Macro will launch a pop up window inside the webpage. More can be read about the GlideDialogWindow here.
- Create the UI Macro.
Name = jqueryMacro
<!--?xml version="1.0" encoding="utf-8" ?-->
<g:reference_decoration id="jqueryMacro" field="${ref}" onClick="invokejQuery('${ref}');" title="Invoke Jquery Example" image="triangle.jpgx"/>

<script type="text/javascript">
function invokejQuery(){
var box = new GlideDialogWindow('jqueryUIpage');
box.setTitle('jQuery');
box.setSize(400,400);
box.render();
}
</script>
- Go the incident form, Right click on the caller field, select Personalize Dictionary, and add the following :
field_decorations=jqueryMacro
*Seperate other attributes with a comma. If you have more than one field decoration, separate each decoration with a comma. More can be read about Dictionary Attributes here. Last note, the attribute ref_contributions can reference only one UI Macro, where as field_decoration can reference multiple UI Macros.
Conclusion:
I have not seen a lot of documentation or usage of jQuery inside ServiceNow. With that said, use at your own risk as the jQuery UI libary does not have the option of the jQuery noConflict. If ServiceNow decides to use jQueryUI, the code may need to be updated to reflect this Stack Overflow question.
Please let me know of any questions or thoughts.
This is a great article however I got lost on the last part, as in where to place ‘field_decorations=jqueryMacro’. Can you help?
Sure, right click on the field (In this example, it’s the caller field) and select Personalize Dictionary. In there you should see an option for attributes…. place the code in there. Please let me know if this is still unclear.